Agent Configuration
The Agent Configuration page allows you to customize your agent's profile information and all trading strategy settings. Changes are saved automatically as you make them.
Overview
The Agent Configuration page is divided into two main sections:
- Agent Profile - Basic agent information (name, ID)
- Trading Strategy - All trading configuration settings organized in tabs
Access the page by navigating to Agent Configuration > Profile & Strategy in the sidebar, or visit /dashboard/agent-profile.
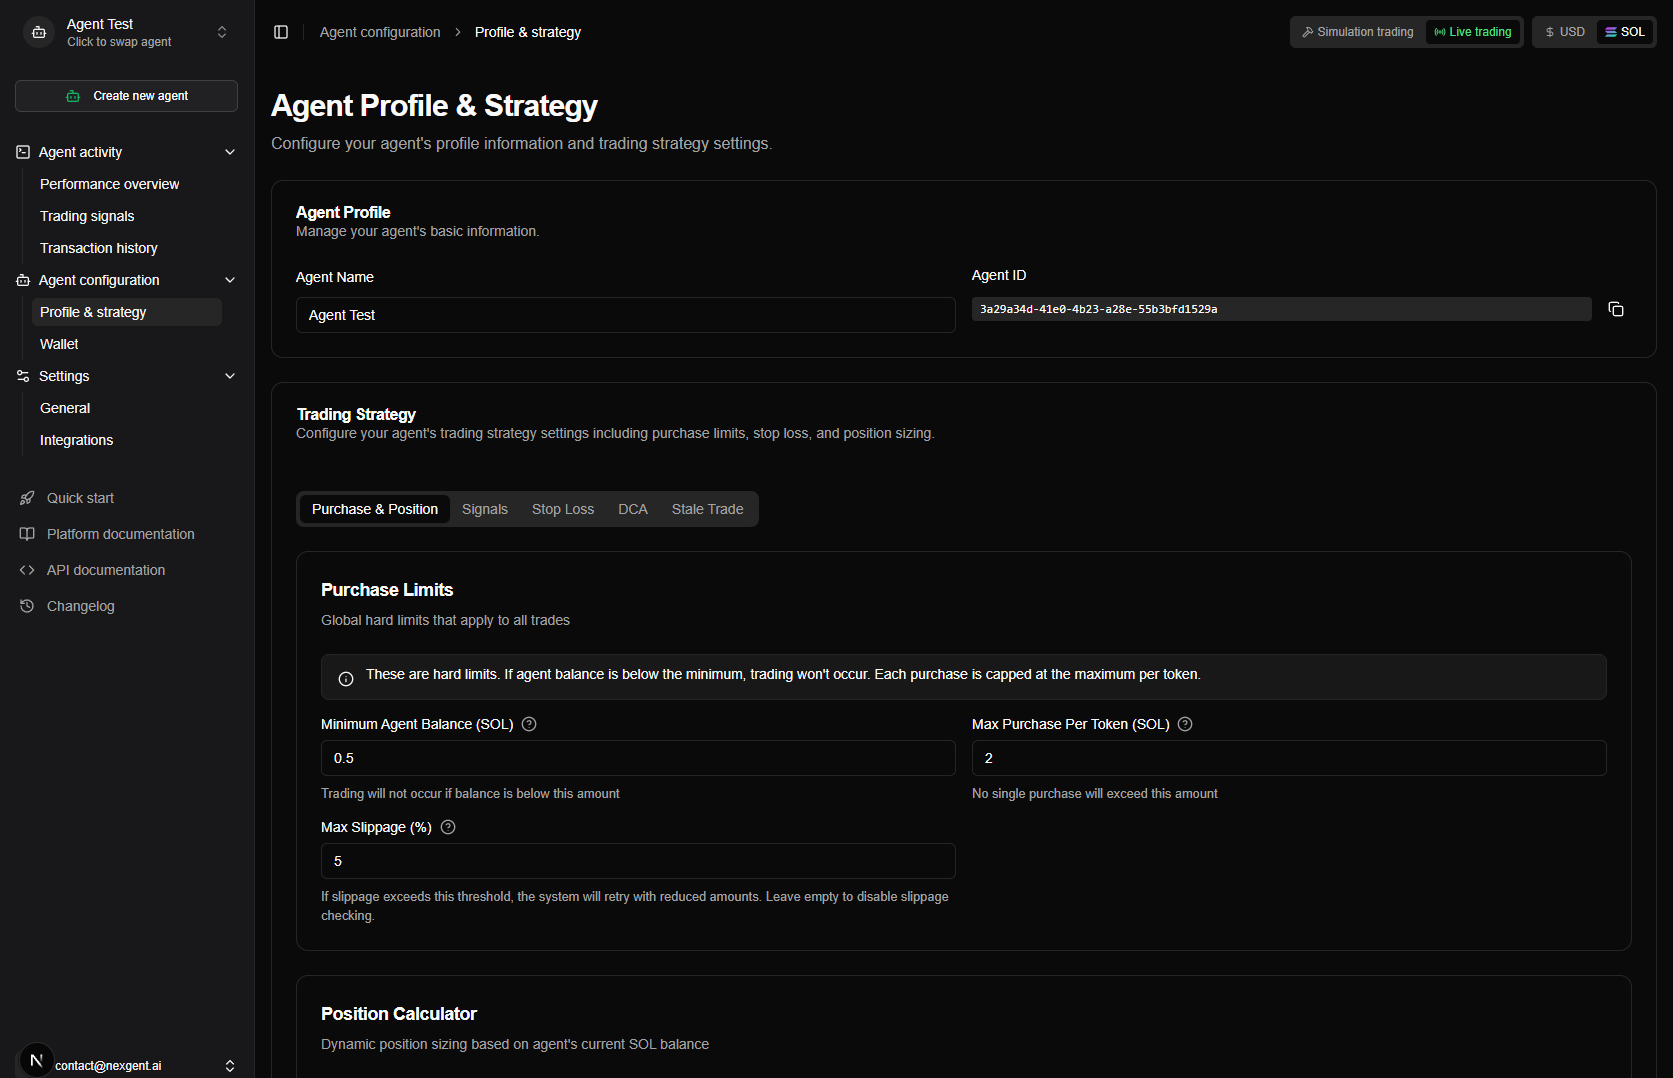
Agent Profile Section
The Profile section contains basic agent information that you can modify.
Agent Name
Edit your agent's display name:
| Field | Details |
|---|---|
| Required | Yes |
| Maximum length | 255 characters |
| Auto-save | Changes save automatically after 1.5 seconds |
The agent name appears:
- In the Agent Switcher dropdown
- On the dashboard
- In all agent-related pages

All changes in the Profile section save automatically. You'll see a "Saving..." indicator when changes are being saved, and "Saved" confirmation when complete.
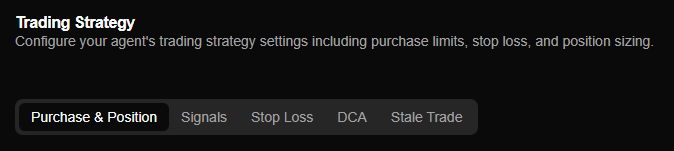
Trading Strategy Section
The Trading Strategy section contains all trading configuration settings, organized in tabs for easy navigation:
| Tab | Description |
|---|---|
| Position | Position sizing, purchase limits, and price impact protection |
| Signals | Configure which signals your agent chooses to execute trades on |
| Stop Loss | Stop loss strategy and configuration |
| DCA | Dollar cost averaging settings |
| Take Profit | Partial take-profit levels and moon bag settings |
| Stale Trade | Stale trade detection and closure settings |
| Auto Trade | Automatic token re-entry after position close |
Like the Profile section, all Trading Strategy changes save automatically with a 1.5 second debounce. No manual save button needed!
Trading Config Export & Load
In the Trading Strategy card header (next to the tab list), two buttons let you export the current agent's config to a file or load another agent's config into the form.

Export to JSON
Button: Export (download icon)
What it does: Downloads the current agent's trading configuration as a JSON file. The filename is based on the agent name (e.g. My-Agent-trading-config.json). The file contains the full config: position sizing, signals, stop loss, DCA, take profit, stale trade, and auto trade settings.
Use cases:
- Backup — Keep a copy of a working config
- Template — Reuse the same config across agents by loading it elsewhere or sharing the file
- Version control — Track config changes over time
Note: Export uses the config currently in the form. If you have unsaved changes, those are what get exported. Save first if you want the last-saved server state.
Load from Agent
Button: Load from Agent (folder-input icon)
What it does: Opens a dialog where you choose another agent.
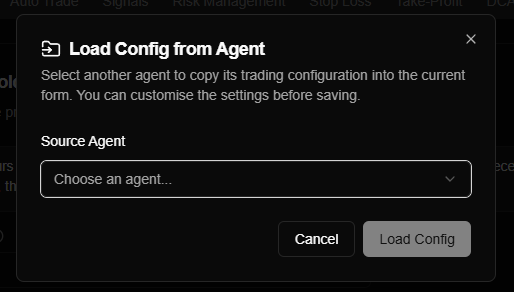
When you click Load Config, that agent's trading configuration is fetched and applied to the current form. You can then review or edit the settings and let auto-save persist them to the current agent.
Use cases:
- Copy a strategy — Start from another agent's config and tweak it
- Template agent — Keep one agent as a "template" and load its config into new agents
- Sync settings — Align two agents' strategies without re-entering everything
Behavior:
- Only agents other than the current one appear in the list (you cannot load from the same agent you're editing)
- If you have unsaved changes, the dialog asks you to confirm: loading will overwrite them. Click Load Config again to confirm
- After loading, the form shows the loaded config; auto-save will apply it to the current agent when you're done editing
- You need at least one other agent to use Load from Agent
Load from Agent copies the other agent's saved configuration from the server. It does not use any unsaved changes that might be open in another browser tab for that agent.
Position Tab
The Position tab controls how much your agent spends on trades, position sizing, and price impact protection. These settings work together to manage your capital allocation and protect against slippage.
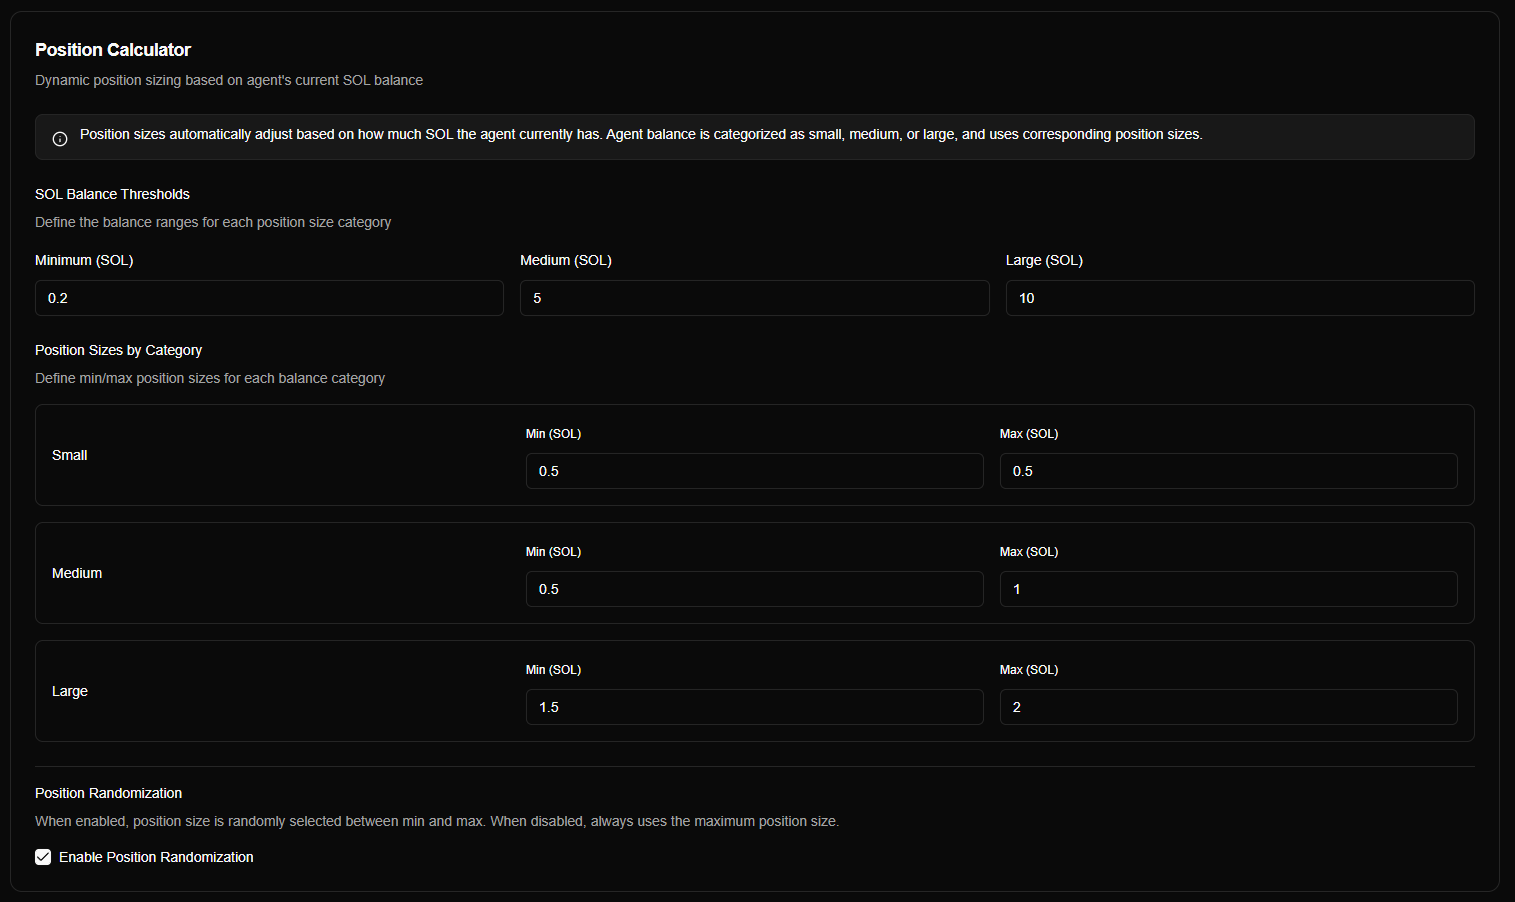
Position Sizing
Controls how positions are sized based on available balance:
| Setting | Description | Default |
|---|---|---|
| Position Size Percentage | Percentage of available balance to use per position (0-100%). Example: 50% means half your balance per position. | 50% |
| Position Size Percentage (Larger Balances) | Position size percentage when balance exceeds the larger balance threshold. Allows smaller position sizes for larger balances. | 25% |
| Larger Balance Threshold | Balance amount (in SOL) where the larger balance percentage kicks in. | 10.0 SOL |
How it works:
- If balance is below threshold → Use Position Size Percentage
- If balance is above threshold → Use Position Size Percentage (Larger Balances)
Example:
- Balance: 5 SOL, Position Size: 50% → Each position uses 2.5 SOL
- Balance: 15 SOL, Larger Balance Threshold: 10 SOL, Larger Position Size: 25% → Each position uses 3.75 SOL
Position size validation:
- Minimum 0.05 SOL — Both min and max position size (per balance range) must be at least 0.05 SOL. This prevents dust-sized trades.
- Max ≥ min — For each balance category (small, medium, large), the max position size must be greater than or equal to the min. The form will not save if max is less than min.
Default position sizes (SOL):
| Balance category | Balance range (SOL) | Min (SOL) | Max (SOL) |
|---|---|---|---|
| Small | 0.2 – 5 | 0.1 | 0.1 |
| Medium | 5 – 10 | 0.5 | 1.0 |
| Large | 10+ | 1.5 | 2.0 |
Balance boundaries default to: Small from 0.2 SOL, Medium from 5 SOL, Large from 10 SOL.
Signals Tab
The Signals tab enables you to configure which signals your agent chooses to execute trades on.
Signals Overview
Configure signal filtering to control which trading signals trigger trades for your agent:
- Minimum Signal Strength — Filter signals by strength (1-5)
- Signal Types — Select which signal types to trade
- Token Filter — Blacklist or whitelist specific tokens
See Trading Signals for details on signal filtering.
Stop Loss Tab
The Stop Loss tab configures how your agent protects positions from losses.
Stop Loss Overview
Stop loss automatically closes positions when prices drop to protect your investment. Configure:
- Stop loss mode (Fixed, Exponential, Zones, Custom)
- Default percentage
- Mode-specific settings
For detailed explanations of each mode, see Stop Loss Modes.
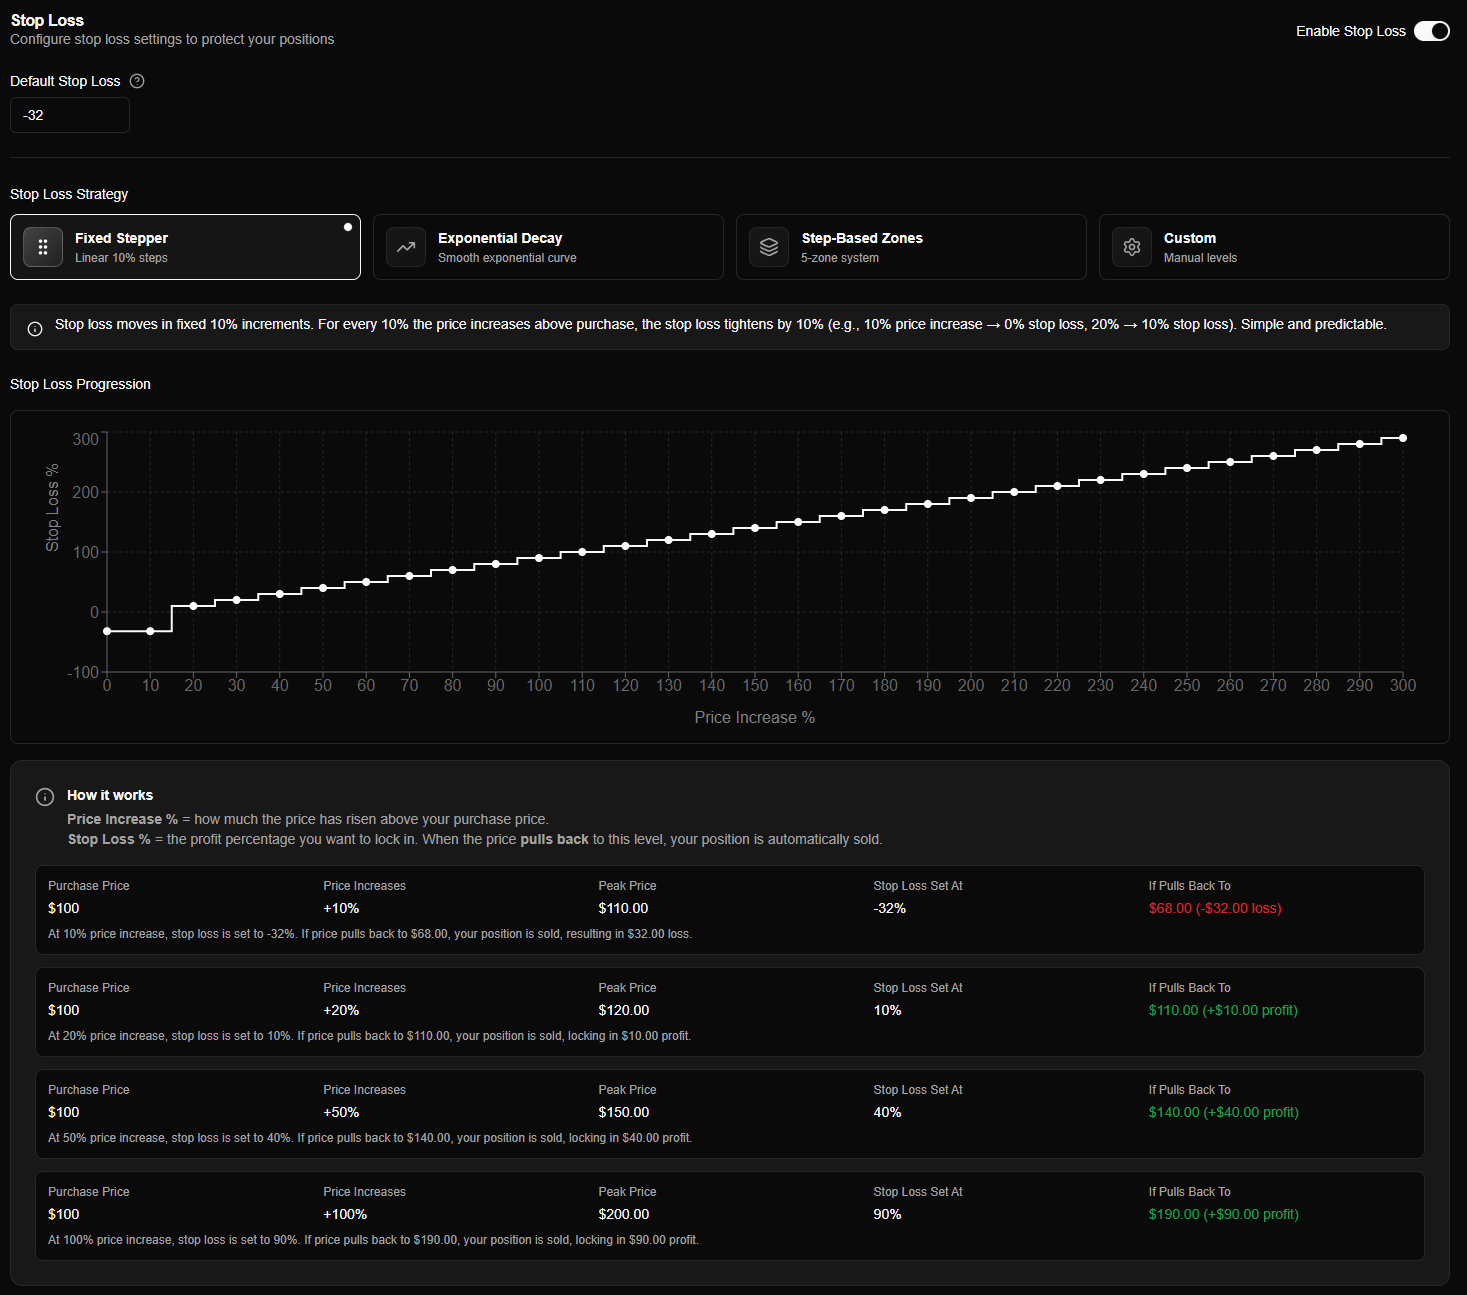
Stop Loss Settings
Basic Settings
| Setting | Description | Default |
|---|---|---|
| Enabled | Enable/disable stop loss protection | Yes |
| Default Percentage | Stop loss percentage used below 20% gain (negative = below purchase price) | -32% |
How it works:
- Below 20% gain → Default percentage applies
- Above 20% gain → Trailing stop loss (mode-dependent) applies
The default percentage prevents stop loss from triggering on normal volatility for small gains.
Take Profit Tab
The Take Profit tab configures automatic partial sales as price increases, locking in gains at predefined milestones.
Take Profit Overview
Take Profit automatically sells portions of your position when price rises above your purchase price (or DCA average). This locks in profits progressively while letting the remaining position continue to benefit from further price increases.
Take Profit and DCA: Both can be enabled on the same agent. Take Profit sells on price rises; DCA buys on price drops. The engine evaluates both independently.
Take Profit Settings
| Setting | Description | Default |
|---|---|---|
| Enabled | Enable/disable partial take-profit | Disabled |
| Mode | Take-profit mode (Aggressive, Moderate, Conservative, Moon Bag, Custom) | Moderate |
| Moon Bag Enabled | Retain a portion of position permanently | Mode-dependent |
| Moon Bag Trigger | Gain percentage to activate moon bag | 300% |
| Moon Bag Retain | Percentage of original position to keep | 10% |
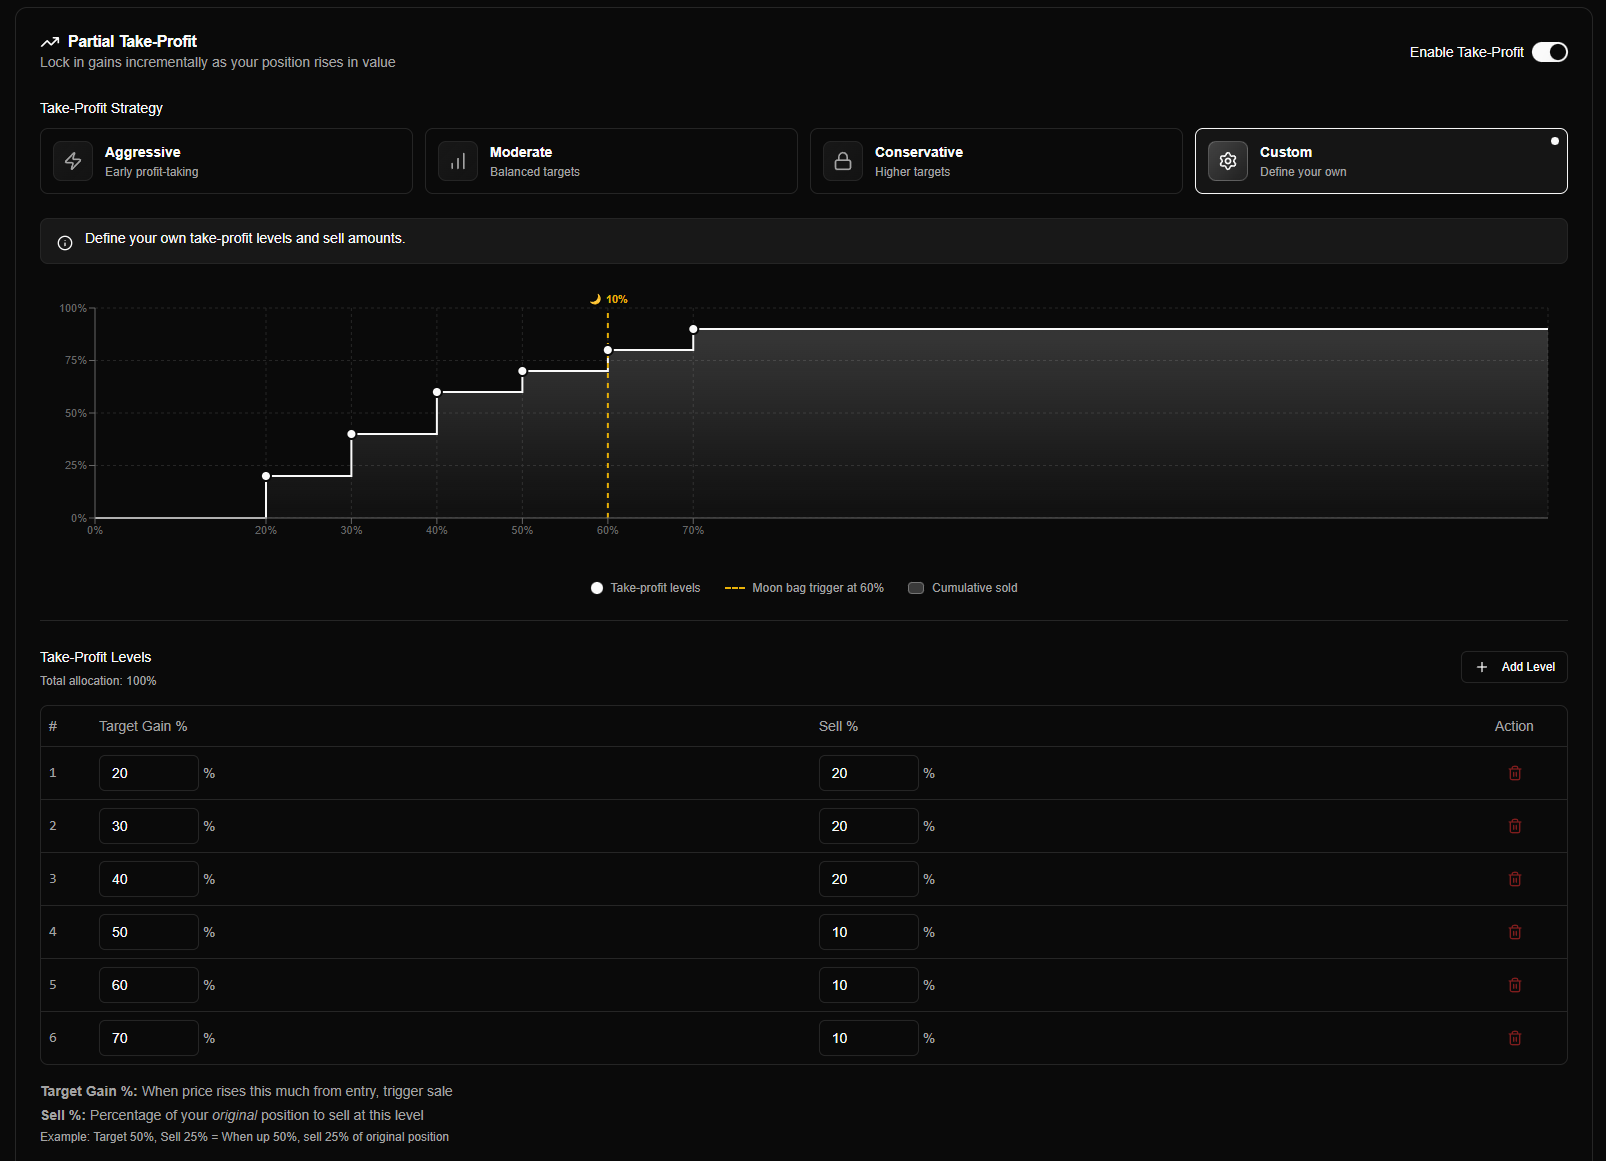
Take Profit Modes
Moderate Mode
Balanced profit-taking across the gain curve.
Levels:
- 50% gain → Sell 25%
- 150% gain → Sell 25%
- 300% gain → Sell 25%
- 400% gain → Sell 25%
Best for: Most traders, balanced approach.
Take Profit Behavior
How Take Profit works:
- Price rises above purchase price (or DCA average)
- Check if gain percentage matches a take-profit level
- Calculate sell amount (percentage of original position)
- Execute partial sale if level is triggered
- Check moon bag activation if threshold reached
Important:
- Each level sells a percentage of the original position size, not the remaining amount
- If price jumps over multiple levels, all missed levels execute together
- Moon bag is set aside before final take-profit level and held indefinitely
- Stop loss still sells everything, including moon bag
See Take Profit Configuration for complete details.
DCA Tab
The DCA (Dollar Cost Averaging) tab configures automatic additional purchases when positions drop in value.
DCA and Take Profit: Both can be enabled on the same agent. DCA buys on dips; Take Profit sells on rises. The engine supports both simultaneously.
DCA Overview
DCA automatically buys more of a token when its price drops below your average purchase price, lowering your average cost basis.
DCA Settings
| Setting | Description | Default |
|---|---|---|
| Enabled | Enable/disable DCA purchases | Yes |
| Mode | DCA mode (Aggressive, Moderate, Conservative, Custom) | Moderate |
| Cooldown | Minimum time between DCA purchases (in hours) | 1 hour |
| Max Count | Maximum number of DCA purchases per position | 3 |
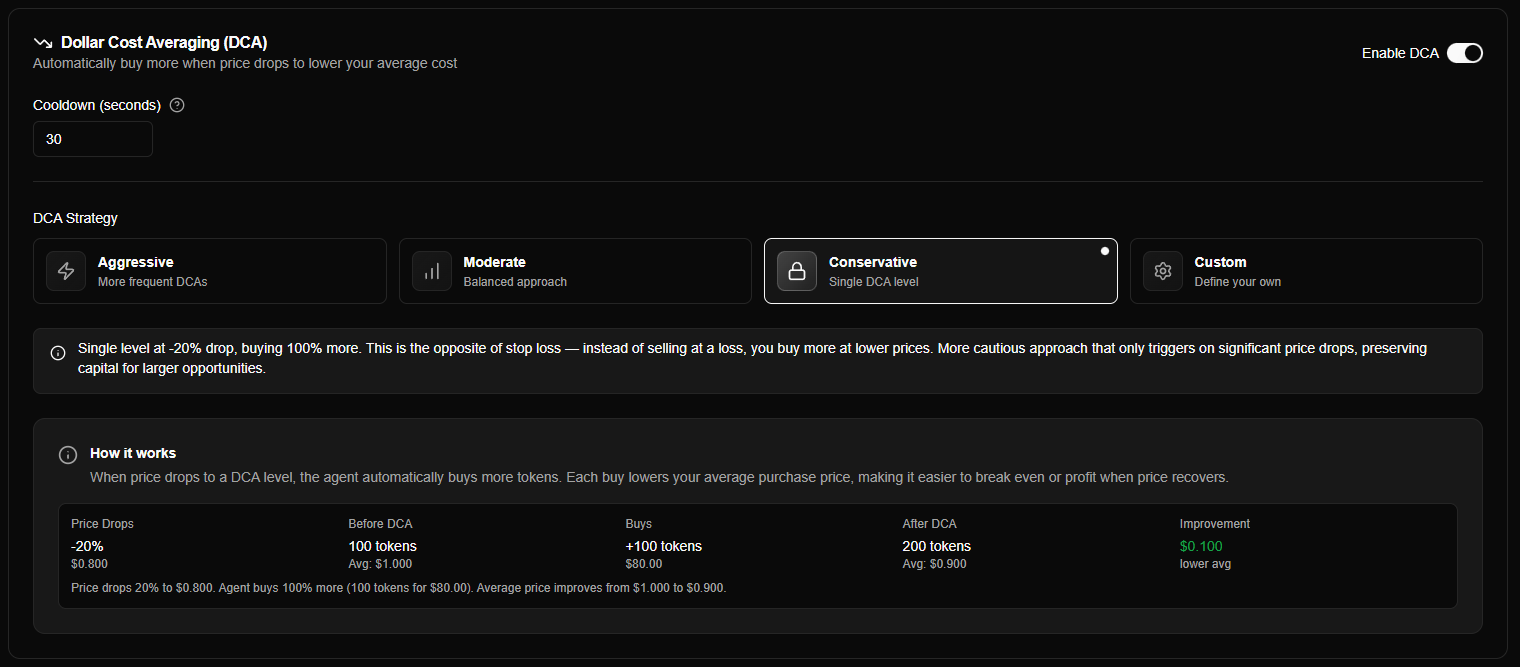
DCA Modes
Moderate Mode
Balanced DCA levels with moderate capital usage.
Levels:
- Level 1: -10% drop → Buy 33% of original
- Level 2: -20% drop → Buy 50% of original
- Level 3: -30% drop → Buy 75% of original
Best for: Most traders, balanced approach.
DCA Behavior
How DCA works:
- Position drops below average purchase price
- Check if drop percentage matches a DCA level
- Verify cooldown period has passed since last DCA
- Verify max DCA count hasn't been reached
- Execute DCA purchase if all conditions met
Important:
- DCA only triggers when price is below average purchase price
- Cooldown prevents rapid consecutive purchases
- Max count prevents unlimited DCA purchases
- Each DCA purchase recalculates the weighted average price
Stale Trade Tab
The Stale Trade tab configures automatic closure of positions that haven't met profit targets within a time limit.
Stale Trade Overview
Stale trade detection closes positions that haven't reached their profit target within a specified time period, freeing up capital for better opportunities.
Stale Trade Settings
| Setting | Description | Default |
|---|---|---|
| Enabled | Enable/disable stale trade detection | Yes |
| Profit Target | Minimum profit percentage required to avoid stale trade closure (0-100%) | 20% |
| Time Limit (Hours) | Maximum hours a position can remain open without reaching profit target | 168 hours (7 days) |
How it works:
- Position is created and timer starts
- If position reaches profit target within time limit → Position stays open (no stale trade)
- If time limit expires without reaching profit target → Position is closed (stale trade)
Example:
- Profit Target: 20%
- Time Limit: 168 hours (7 days)
- If position doesn't reach 20% gain within 7 days → Position closes automatically
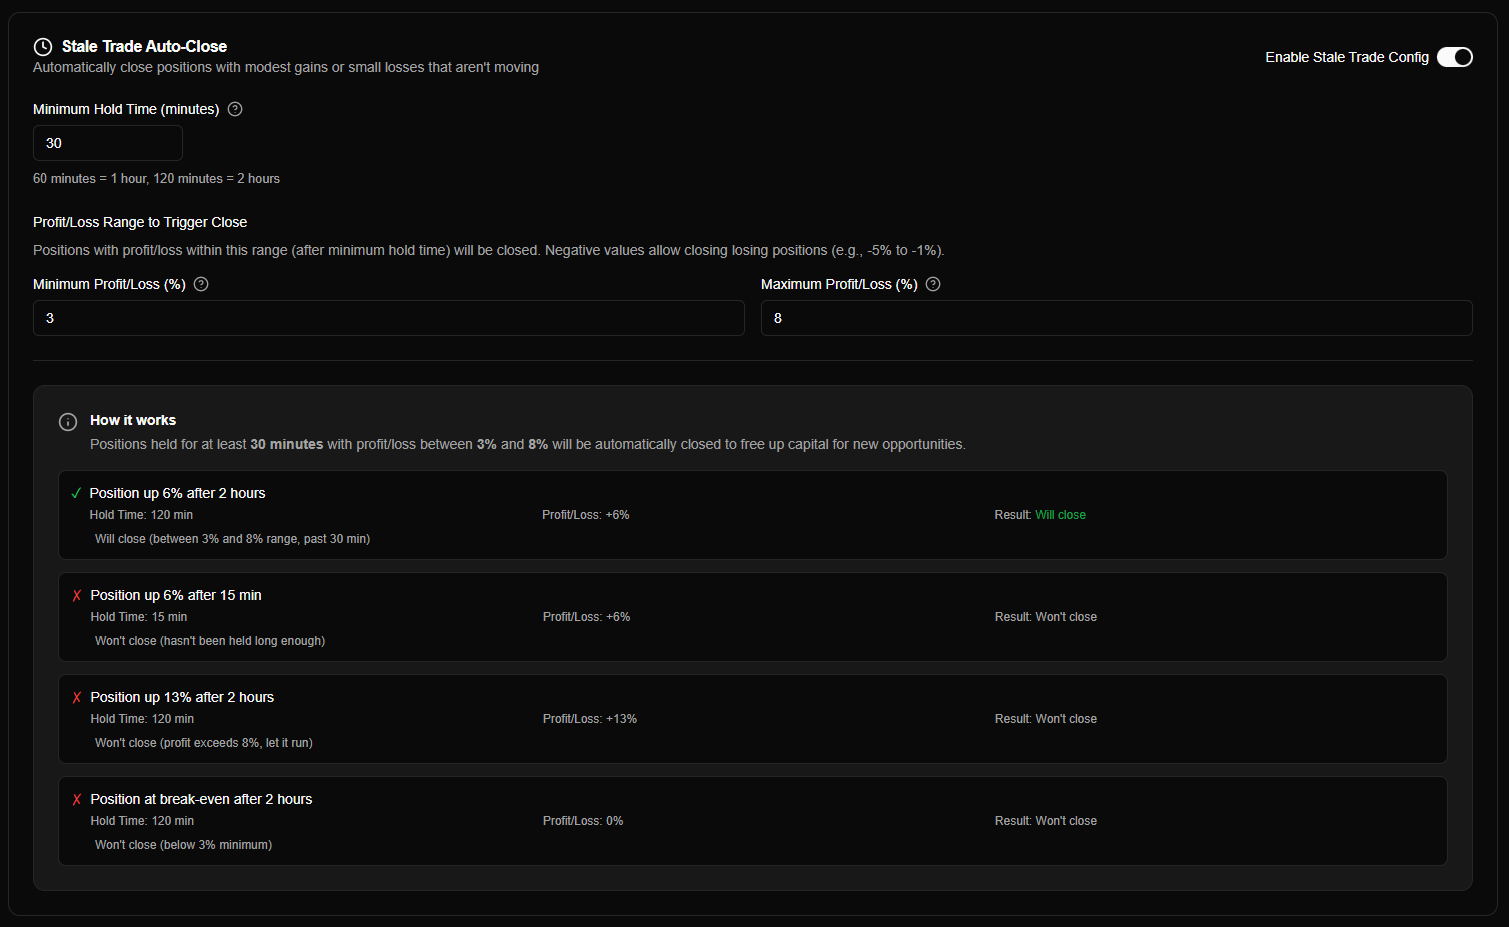
Stale Trade Behavior
Important considerations:
- Stale trade detection applies to all positions regardless of current profit/loss
- Timer starts from position creation, not from last DCA purchase
- Positions that reach the profit target are exempt from stale trade closure
- Stale trades free up capital for new opportunities
Best practices:
- Set profit target based on your typical position gains
- Adjust time limit based on your trading timeframe (short-term vs. long-term)
- Monitor stale trade closures to fine-tune settings
Auto Trade Tab
The Auto Trade tab configures automatic token re-entry when positions close. Add tokens by mint address, toggle each one on or off, and set optional per-token market-cap bounds.
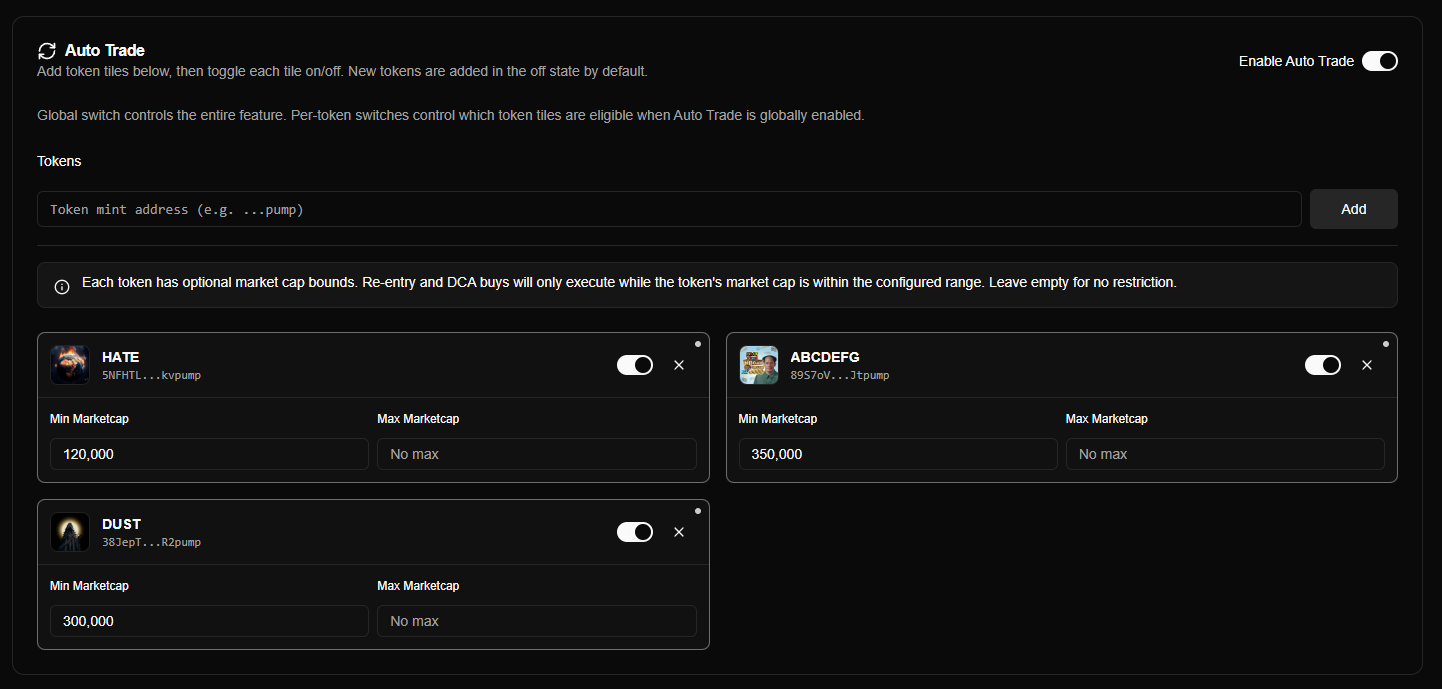
Auto Trade Overview
When auto trade is enabled and a token in the list is toggled on, the engine automatically re-purchases that token whenever its position closes — regardless of whether the close was triggered by stop loss, take profit, stale trade, or manual action.
Auto Trade Settings
| Setting | Description | Default |
|---|---|---|
| Enable Auto Trade | Global switch for the entire feature | Disabled |
| Token List | Solana mint addresses to track for re-entry | Empty |
| Per-Token Toggle | Enable/disable auto-trade per token | Off (when added) |
| Min Marketcap | Optional minimum market cap (USD) per token | No minimum |
| Max Marketcap | Optional maximum market cap (USD) per token | No maximum |
How it works:
- A position closes for an enabled token
- The engine checks market-cap bounds (if configured)
- If the market cap is within range, a new position opens using standard position sizing
- A background reconciliation loop (every 10 minutes) catches any missed re-entries
Key points:
- New tokens are added in the off state — toggle on when ready
- Market-cap bounds are optional; leave empty for no restriction
- Auto-trade purchases create synthetic
Auto-tradesignals visible in your Trade Signals page - All normal execution guardrails apply (balance checks, price impact, etc.)
See Auto Trade Configuration for complete details on re-entry behavior, reconciliation, market-cap policy, and examples.
Auto-Save Feature
All configuration changes save automatically:
| Feature | Details |
|---|---|
| Save trigger | Changes save automatically after 1.5 seconds of inactivity |
| Status indicator | Shows "Saving...", "Saved", or "Save failed" in header |
| No manual save | No save button needed - all changes are automatic |
| Form validation | Invalid values prevent saving until corrected |
Save status indicators:
- "Saving..." - Changes are being saved
- "Saved" - Changes saved successfully (displays for 2 seconds)
- "Save failed" - Error occurred, please check your settings
If you see "Save failed", check for form validation errors (red text under fields). Fix any errors and the form will save automatically once valid.
Common Questions
Can I change my agent name?
Yes! Edit the agent name in the Profile section. Changes save automatically.
Can I delete my agent?
Agent deletion is available through your agent settings. See your platform's agent management features.
What is the Agent ID used for?
The Agent ID is a unique identifier for API calls, webhooks, and technical troubleshooting. You can copy it using the copy button.