DCA Configuration
DCA (Dollar Cost Averaging) automatically buys more tokens when price drops below your average purchase price, lowering your average cost basis. This guide explains how to configure DCA settings for your trading agent.
Overview
DCA configuration consists of four main settings:
- Enable/Disable - Turn DCA on or off
- DCA Mode - How many DCA levels and when they trigger
- Cooldown - Minimum time between DCA purchases
- Max DCA Count - Maximum number of DCAs per position
Access DCA configuration in Agent Configuration > Trading Strategy > DCA tab.

What is DCA?
DCA is the inverse of stop loss:
| Aspect | DCA | Stop Loss |
|---|---|---|
| Direction | Buy on dips | Sell on drops |
| Purpose | Lower cost basis | Limit losses |
| Risk | More exposure | Less exposure |
| Best for | Bullish conviction | Risk management |
| Default | Disabled | Enabled |
How it works:
- When price drops below your average purchase price
- Agent automatically buys more tokens at the lower price
- Average purchase price decreases (weighted average)
- Position becomes profitable at a lower recovery price
Example:
- Purchase: 1 SOL at $1.00 = 1000 tokens
- Price drops to $0.80 → DCA buys 0.75 SOL more = 937.5 tokens
- New average: $0.903 per token (lower than original $1.00)
- Recovery to $1.00 now equals 10.7% profit (vs 0% without DCA)
Enabling DCA
The DCA toggle enables or disables automatic averaging down:
| Setting | Description | Default |
|---|---|---|
| Enable DCA | Turn DCA purchases on/off | Disabled |
When enabled:
- Agent monitors price drops from average purchase price
- Triggers DCA purchases at configured drop levels
- Automatically buys more to lower cost basis
- Respects cooldown and max count limits
When disabled:
- No automatic purchases on price drops
- Manual purchase only
- Position maintains original purchase price
DCA increases your position size and capital exposure. Only enable if you have sufficient capital and conviction in the token's recovery potential.
DCA Modes
DCA modes define when to trigger DCA and how much to buy. Choose a mode based on your conviction level and risk tolerance.
Mode Selection
Four modes are available:
| Mode | Description | Best For |
|---|---|---|
| Aggressive | 3 levels at -10% drop, each buying 100% more | High conviction, rapid averaging |
| Moderate | 2 levels at -20% drop, each buying 75% more | Standard positions, balanced approach |
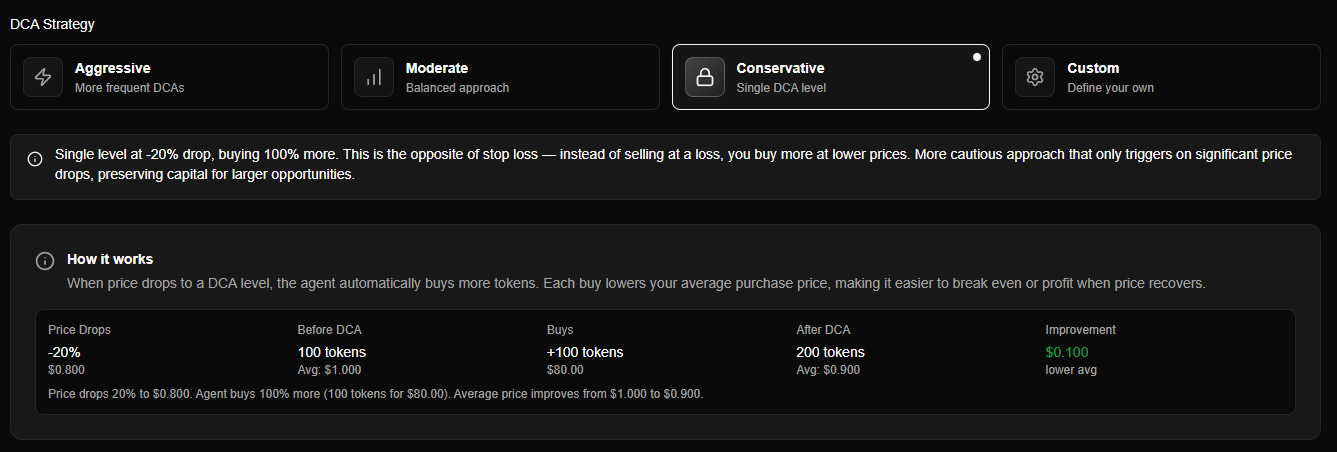
| Conservative | 1 level at -20% drop, buying 100% more | Uncertain markets, single DCA |
| Custom | Manual discrete levels you define | Advanced users, specific strategies |
Select your mode using the mode selector in the DCA tab. Each mode displays a brief explanation when selected.
Mode Details
Moderate Mode (Default)
Behavior: 2 levels at -20% drop, each buying 75% more of current position value.
Configuration: Predefined levels (no additional configuration needed).
| DCA # | Trigger | Buy Amount | Behavior |
|---|---|---|---|
| 1st | -20% from initial average | 75% of position | Buy 75% more |
| 2nd | -20% from new average (after 1st DCA) | 75% of position | Buy 75% more again |
Example:
- Initial: 1 SOL at $1.00 = 1000 tokens
- 1st DCA (price at $0.80): Buy 0.75 SOL more = 937.5 tokens → Average: $0.903
- 2nd DCA (price at $0.722): Buy 0.68 SOL more = 939.6 tokens → Average: $0.855
| Characteristics | Notes |
|---|---|
| Moderate levels | -20% drops require larger price movements |
| Balanced buys | 75% increases position moderately |
| Moderate capital usage | Reasonable capital requirements |
| Balanced averaging | Cost basis drops at moderate pace |
Best for: Standard positions with balanced approach. Recommended for most traders.
See DCA - Moderate Mode for detailed explanation.
Cooldown Period
The cooldown period is the minimum time between DCA purchases:
| Setting | Description | Default | Range |
|---|---|---|---|
| Cooldown (seconds) | Minimum time between DCA buys | 30 seconds | 10 seconds to 1 hour |
How it works:
- After a DCA purchase, the cooldown timer starts
- Next DCA cannot trigger until cooldown expires
- Prevents rapid-fire DCAs during volatile price swings
- Gives price time to stabilize between buys
Example:
- Cooldown: 30 seconds
- 1st DCA executes at $0.80
- Price drops further to $0.75 within 10 seconds
- 2nd DCA waits until 30 seconds have passed since 1st DCA
Best practices:
- 10-30 seconds: For highly volatile tokens with rapid price swings
- 60-300 seconds: For moderate volatility, allows price stabilization
- 600+ seconds: For conservative approach, very patient waiting
Cooldown prevents over-buying during volatile price swings. Adjust based on token volatility - more volatile tokens may need longer cooldowns.
Max DCA Count
The max DCA count limits the maximum number of DCA purchases per position:
| Setting | Description | Default | Range |
|---|---|---|---|
| Max DCA Count | Maximum number of DCAs per position | 3 | 1 to 10 |
How it works:
- Each position can have up to this many DCA purchases
- After max count is reached, no more DCAs for that position
- Prevents unlimited buying into a falling knife
- Protects capital from excessive exposure
Example:
- Max DCA Count: 3
- Initial purchase triggers first position
- 1st DCA executes (count = 1)
- 2nd DCA executes (count = 2)
- 3rd DCA executes (count = 3)
- Further price drops do not trigger more DCAs (max reached)
Best practices:
- 1-2 DCAs: Conservative, limits capital exposure
- 3 DCAs: Balanced (default), good for most traders
- 4-6 DCAs: Aggressive, requires high conviction and capital
- 7-10 DCAs: Very aggressive, only for extremely high-conviction plays
Max DCA count protects against unlimited averaging down. Set based on your available capital and conviction level. Too many DCAs can lead to excessive losses if a token never recovers.
How DCA Works
Weighted Average Price
After each DCA purchase, your average purchase price becomes a weighted average:
newAveragePrice = totalInvestedSOL / totalTokensExample Calculation:
- Initial: 1 SOL buys 1000 tokens at $0.001 SOL/token
- 1st DCA: 0.75 SOL buys 937.5 tokens at $0.0008 SOL/token
- New average: (1 + 0.75) SOL ÷ (1000 + 937.5) tokens = $0.000903 SOL/token
Important: Each DCA buy updates the average price, so subsequent DCA levels are measured from the new average (not the original purchase price).
DCA Evaluation Process
DCA is evaluated on every price update (same as stop loss):
- Check if enabled - DCA must be enabled in agent config
- Check cooldown - Verify minimum time since last DCA has passed
- Check max count - Ensure not exceeded max DCAs for this position
- Calculate drop -
dropPercent = ((currentPrice - avgPrice) / avgPrice) × 100 - Find level - Match drop to next unused DCA level (based on dcaCount)
- Trigger buy - Execute DCA purchase if all conditions met
DCA vs Stop Loss Interaction
DCA and stop loss work independently:
- DCA: Buys more when price drops (up to limits)
- Stop Loss: Sells if price drops too far
You can use both together:
- DCA lowers cost basis on small drops
- Stop loss limits losses on large drops
- Combined strategy: Average down with DCA, cut losses with stop loss
Custom Mode Configuration
When using Custom mode, you must manually configure DCA levels.
DCA Levels Editor
The DCA levels editor allows you to add, edit, and remove custom DCA levels:
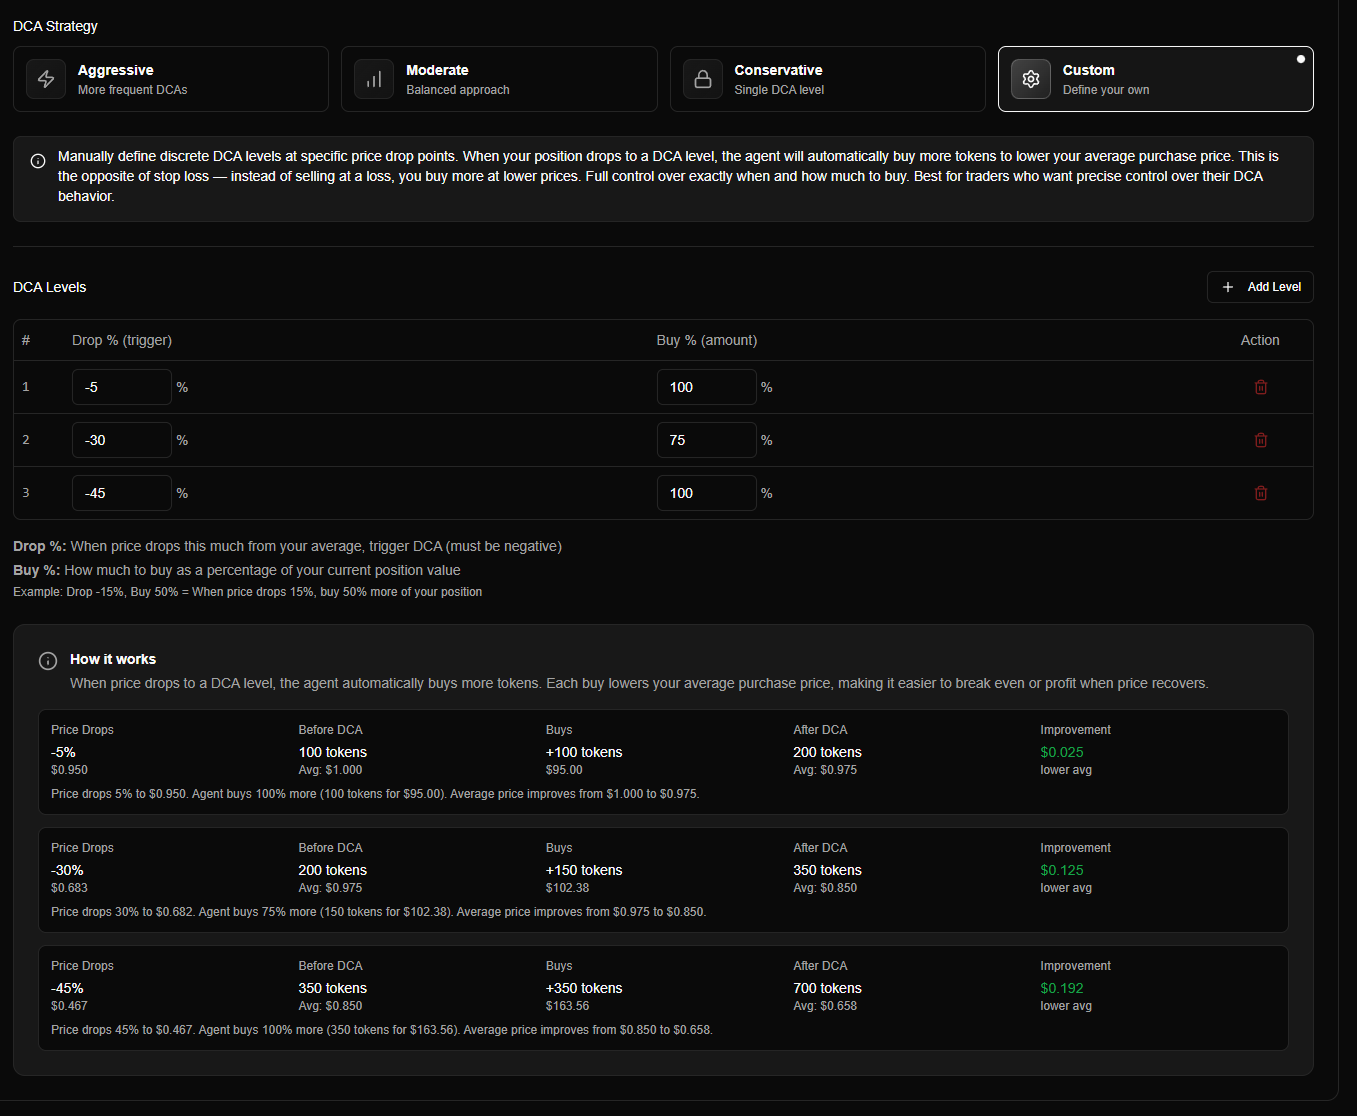
Custom mode DCA levels editor showing manual level configuration
Adding Levels
Each level requires two values:
| Field | Description | Example |
|---|---|---|
| Drop Percent (%) | Price drop percentage from current average (negative) | -20 (20% drop) |
| Buy Percent (%) | Amount to buy as percentage of current position value | 75 (buy 75% more) |
How it works:
- Levels are evaluated sequentially based on position's DCA count
- 1st DCA uses first level, 2nd DCA uses second level, etc.
- Each DCA is measured from the current average price (updated after each DCA)
Level Requirements
Custom mode has specific requirements:
| Requirement | Details |
|---|---|
| Minimum levels | At least 1 level required when DCA is enabled |
| Sorting | Levels must be sorted by drop percent (least negative first: -10%, -20%, -30%) |
| Drop percent range | Must be negative (-100 to 0) |
| Buy percent range | Must be positive (1 to 1000+) |
Validation:
- System validates levels are sorted correctly
- System validates drop percent is negative
- Invalid configurations prevent saving
Example Custom Configuration
Strategy: Moderate averaging with custom thresholds.
Configuration:
Level 1: Drop -15%, Buy 50%  → At -15% drop, buy 50% more
Level 2: Drop -30%, Buy 100% → At -30% drop, buy 100% more
Level 3: Drop -45%, Buy 75% → At -45% drop, buy 75% moreBehavior:
- Price drops 15% → 1st DCA buys 50% more
- Average price updates, price drops another 15% from new average → 2nd DCA buys 100% more
- Average price updates, price drops another 15% from new average → 3rd DCA buys 75% more
Configuration Best Practices
Choosing a Mode
| Use Case | Recommended Mode |
|---|---|
| Beginner trader | Moderate |
| High conviction | Aggressive |
| Uncertain markets | Conservative |
| Specific strategy | Custom |
Recommendation: Start with Moderate mode - it's balanced and works well for most traders.
Setting Cooldown
| Cooldown | Use Case |
|---|---|
| 10-30 seconds | Highly volatile tokens, rapid price swings |
| 30-60 seconds | Moderate volatility (default) |
| 60-300 seconds | Less volatile, allows stabilization |
| 300+ seconds | Very conservative, patient approach |
Recommendation: Start with 30 seconds (default). Adjust based on token volatility.
Setting Max DCA Count
| Max Count | Use Case |
|---|---|
| 1-2 | Conservative, limits exposure |
| 3 | Balanced (default), good for most traders |
| 4-6 | Aggressive, high conviction |
| 7-10 | Very aggressive, extremely high conviction |
Recommendation: Start with 3 (default). Only increase if you have strong conviction and sufficient capital.
Risk Management
Important considerations:
- Monitor positions - Don't blindly average down into losses
- Use with stop loss - DCA lowers cost, stop loss limits downside
- Sufficient capital - Ensure you can afford multiple DCA purchases
- Strong conviction - Only use DCA on tokens you believe will recover
When to avoid DCA:
- Weak conviction in token recovery
- Limited capital for multiple buys
- Scam or dead tokens (don't average down into these)
- Continuous decline (token may not recover)
Common Questions
What happens if I disable DCA?
When disabled:
- No automatic purchases on price drops
- Position maintains original purchase price
- Manual purchase only
- No averaging down
You can re-enable DCA anytime - it will start monitoring from that point forward.
Can I use DCA and stop loss together?
Yes! DCA and stop loss work independently:
- DCA: Buys more on small drops (lowers cost basis)
- Stop Loss: Sells on large drops (limits losses)
Combined strategy provides both averaging down and loss protection.
Does DCA work in simulation mode?
Yes! DCA works identically in both simulation and live modes. Test your DCA strategy in simulation before going live.